
deutsch
Hints and tricks
Here are my solutions to some of the problems that keep bothering luteplayers in everyday life. If you have better suggestions, please let me know, since I do not claim to have the best answers.
I have tried to express my hints as accurately as possible, but I exclude liability should anything go wrong when you follow my advice.
Calculating the position of the frets
Frets
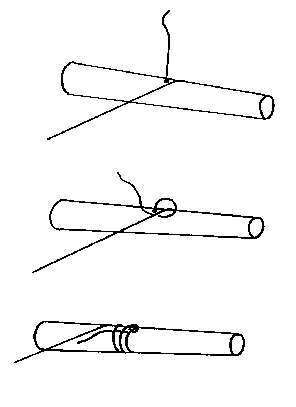
 Frets can be an exasperating problem. I'll try to explain the knot I use: At best you tie it a little above the place where it shall actually be situated. Pushing it down the somewhat tapered neck will tighten it.
With a soldering iron I burn the end of a piece of gut string of appropriate thickness so that it thickens a little. A simple knot is done, that can be tightened later on. The thickened end made with the soldering iron keeps it from opening.
Keep the lute with its back towards you, holding the body between your legs like a viol, and place the fret around the neck. Then push the open end of the piece of string through the knot which has not yet been tightened.
Now the first knot is pulled tight. The free end on the left side has to be stuck in between fret and neck, and afterwards through the open sling. Using a finger of your left hand coming around the neck you can hold on to the knot.
Further down on this page there is a description of how to calculate the correct position of the frets.
Humidity and hygrometer

Besides the fact that a decent humidity is good for our well-being, musical instruments should be kept within a certain range of humidity. Otherwise you might be confronted with problems concerning the action and cracks in the soundboard.
I would consider 40 to 75% relative humidity a decent value. The main problem with keeping within this range is getting a hygrometer giving exact results. To my experience, electronic devices are frequently quite inaccurate. I came across differences of 10% up or down. An adjustable hair hygrometer would be a better choice. But expensive or not - these devices have to be adjusted from time to time.
In the instruction manual you are normally told to wrap the hygrometer in a moist piece of cloth and after half an hour adjust it to 98% relative humidity. You then have a pretty exact measure for the range around 98%, but who has the humidity of tropical rain forest in his house?
It is better to adjust the hygrometer within the range that is supposed to be actually kept, for instance 50% RH. The table on the left shows some salts and their exact percentages of humidity in a saturated solution at 20 degrees centigrade.
It is quite simple. Just take a glass of water and keep adding the chosen chemical until the mixture is saturated. Then pour the entire mixture including the sediments into a bigger jar that can be closed tight. Place your hygrometer on some sort of support pad clear above the fluid. Close the jar airtight, and after two hours or more you can adjust your hygrometer to the percentage pertaining to the chemical used.
If this is too much trouble or too expensive getting a suitable salt from the pharmacy you may use plain sodium chloride or cooking salt. With 76% it is at the upper limit of suitable chemicals, but this method is still better that using the moist cloth.
If your hygrometer cannot be adjusted, go through the procedure anyway and note the percentage it displays after two hours or more. The value indicated gives you the relative humidity the chemical used produces. If you get 82% with cooking salt for example, your hygrometer differs up 6% from the true value. But this pertains only for this value, not necessarily to the whole range of the device. If you want more precision, you should repeat this calibration with several chemicals, potash (potassium carbonate) for instance indicating 45%. The procedure also works with digital devices.
Pegs and pegbox

If the pegs of your lute are of good quality, they should cause little trouble. The frequently quoted "a lute player spends half his life tuning..." should be put into perspective that way.
You should however take care of your pegs. A lot of the intruments brought to my workshop for repair come in because of pegs malfunctioning, the reason being mostly lack of maintenance, while the luthier had done a good job initially.
I believe pegs should be cleaned once a year and put back into place with fresh peg compound. By and by the material between peg and pegbox becomes firm and glossy. Therefore you have to keep pressing the peg further in order to steady it, which may eventually result in breaking the side of the pegbox. I am not going to comment on which peg compound is best - there is plenty of fighting about beliefs in the world. Baby powder or chalk with curd soap is favoured by quite a few people.
Looking at pegs I am sometimes reminded of the stick I used for my kite's string as a child. You may have payed the whole string, but you're not forced into winding up all of it.
If you spool but 5 windings on the peg this does not only look tidy, but the lute will stay in tune sooner. Besides you avoid damaging the pegbox. When winding too much of the string, part of it may get caught between windings and wood, thus building up pressure and ultimately cracking the side of the pegbox.
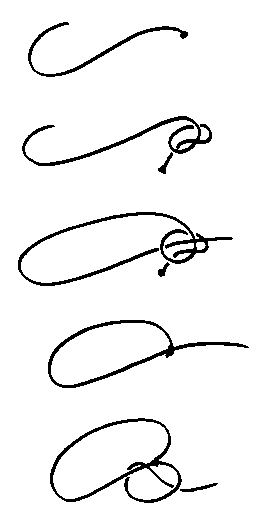
I tried to draw the knot I use when fixing a string to the peg. Having pushed the string through the hole in the peg I turn the peg until the end of the string shows up between the side of the pegbox and the first winding. Then I place the end first above, then below the piece of string going to the nut and form a little loop. The end of the string now points towards the side of the pegbox. The next windings are placed across this end of string locking it. A few more windings, and the string tightens and stays in tune. If you leave the end long enough, you can use the string again for example after applying new peg compound. A pair of tweezers or long-nose pliers are helpful for this job.
Waxing the soundboard
I do not varnish the soundboards of my historical instruments, but protect them with a wax of my own production. The biggest advantage is that taking off the soundboard is a lot easier. Traces of the process can be minimized that way. One drawback is the somewhat greater response to changes of humidity.
I suggest renewing the wax once a year. The best opportunity is when you restring your lute. Use a piece of lint-free cloth with white spirit (lighter fuel) to carefully wipe the soundboard until the rag doesn't gather any more dirt from it. The rag shouldn't be really wet, just moist, white spirit don't damage the varnish of the lute's body. Take care around the bridge, since it might be coloured black and the paint may be white spirit soluble.
After some time the white spirit will have evaporated and you can start applying new wax. Actually I use an antic wax which is used in restoration of old furniture. Again take some fluffless cloth and fold a small pad. Then take a small amount of wax, about pea-sized, and rub it into the wood with circular movements. Move the pad until you feel it gliding over the soundboard without sticking to it. By no means try using pressure when putting on the wax. The worst result would be a crack in the soundboard.
This may sound difficult, but once you have tried it on an untreated plane piece of wood you'll soon notice, that it is actually quite easy to do. With new instruments I always offer to do the first inspection free of charge together with the customer. This includes cleaning and waxing the soundboard.
Calculating the position of the frets
If you have to reposition the frets, either because you want to put new frets on your instrument or because you misaligned them by accident, it might be helpful to calculate the exact positions. Who can claim to have an absolutely accurate sense of hearing!
Without having to look for scientific formulas or using your calculator I would like to provide an alternative to find the necessary data. The calculation is for equal temperament. Any calculations for meantone temperament are more complicated, since the position of the frets depends on the key you are going to play in. This topic is treated in detail in the book "Lutes, Viols, Temperaments", Cambridge University Press, ISBN-10: 0521288835 by Mark Lindley.
You may know that it is not sufficient to just take half of the string length measured between bridge and nut to find the position of the fretted octave. When you press down a string to the fretboard, its tension increases a trifle, and consequently there is a slight rise in pitch, so the twelfth fret has to be placed a little closer to the nut. An increase in distance between fret and bridge lowers the frequency.
If the harmonic above the twelfth fret and the fretted note match, this fret must be positioned correctly. The distance between 12th fret and nut equals half the string length. If for example you measure exactly 30 centimetres, the string length for your calculation is 60 cm. Put "60.0" into the field for string-length in the form above. After you have clicked on "Send" you'll immediately receive the distance for each fret from the nut.
With a wide neck it would be sensible to calculate the frets for the first course and the lowest fretted bass strings seperately. Particularly with baroque lutes you often find that the bridge is placed a little obliquely on the soundboard for reasons concerning construction and sound. Therefore the frets are not parallel to each other, but arranged slightly fan-shaped.
As the 12 fret (if there is one in the first place) rarely goes underneath the bass courses, you may have to apply a little auxiliary fret like a round tooth-pick with adhesive tape to the soundboard. Press the tape against your clothing before actually attaching it, so that it won't pull wood fibres from the soundboard when removed. Move this auxiliary fret until the fretted string gives the same pitch as the harmonic. The distance to the nut is the correct figure for your calculation.
Should the harmonic above and the string at the 12th fret not give the same pitch, I suggest you try several strings, since a string can be out of tune with itself. If the fret keeps giving too high or low notes, the glued wooden frets on your lute might be misplaced. In this case use a round tooth-pick or something similar for finding the correct position, and use this for your calculation.
To avoid having to go through this procedure every time when you have to rearrange frets, it would be good to make a positioning device. Mark the fret-positions on a piece of cardboard. Its borders should correspond to the first course and the last fretted bass string, for which you did the calculation. By placing it underneath the strings touching the nut you can easily check your frets.